Sunday 29 November 2015

Wish Bottles


WISH BOTTLES


We love these cute little bottles that are filled with dandelions puffs for making wishes!!

 We collected all our ‘bits’ for the wish bottles:


Bottle, dandelion, fine silver cord, charms and gem-stone beads.

The first step was to put some dandelion puffs into the little bottles. We used tweezers and put them in one at a time, then pushed the cork in to seal it.
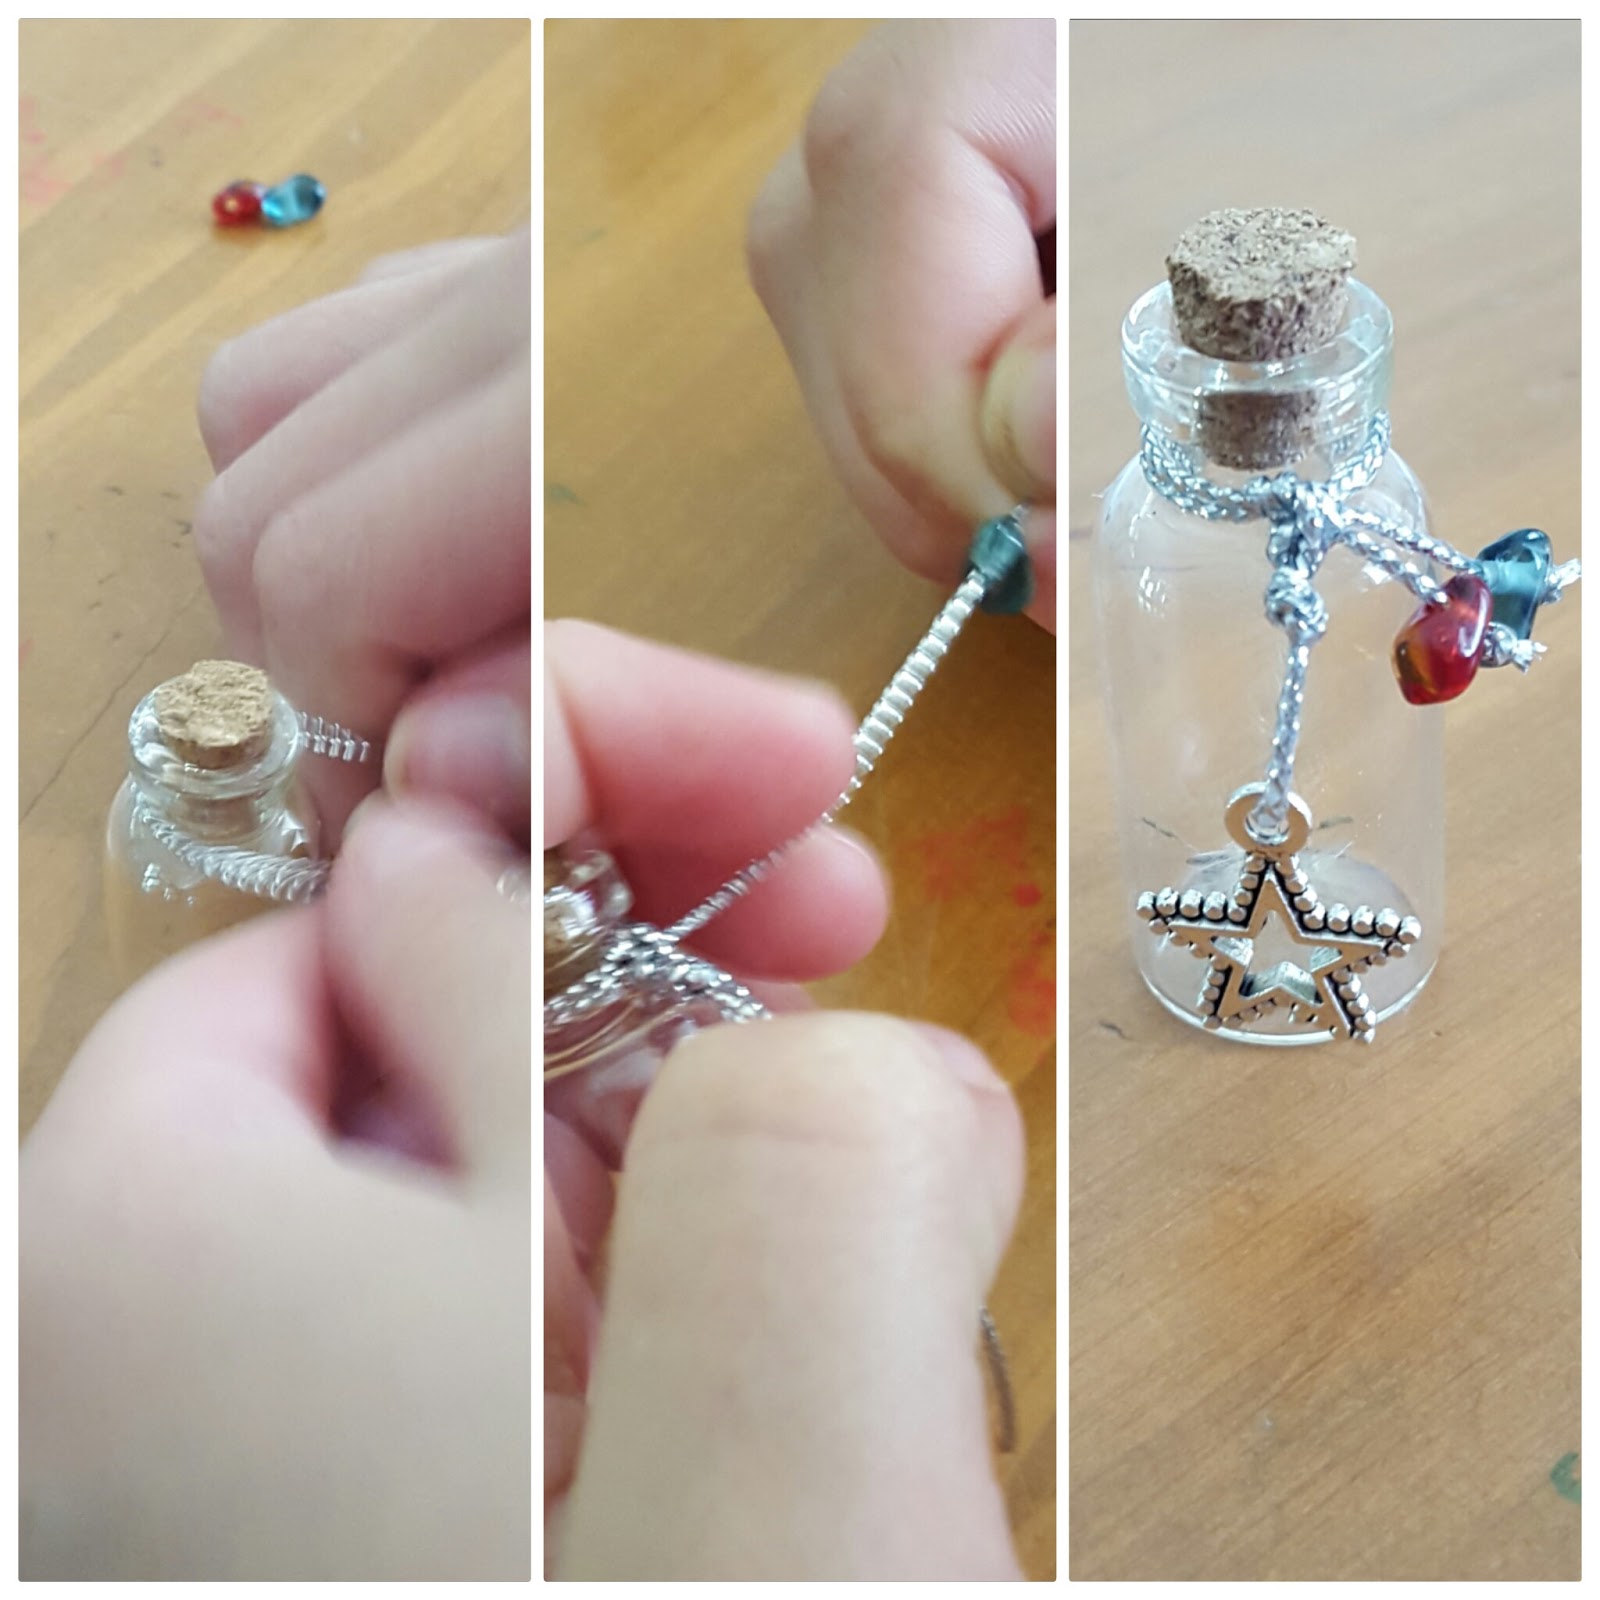

Using about 30cm of silver cord Serena tied a charm in the centre then tied it around the neck of the bottle.


With the ends of the silver cord she threaded on some Gem stone beads then tied a knot so they won’t slide off!!


(She also wanted a gem-stone glued onto the cork lid)


These make great little personalized novelty gifts.


Thursday 26 November 2015

DIY Earings/Studs


DIY Earrings/Studs 
We now have a different set of studs to choose from every day of the month!!
 
I got out our bead collection box and also the button collection and anything else that Serena wanted to use for her Stud earrings!!
We pair up our beads, buttons and bits that we were going to use as Stud earrings and place then face down onto a piece of paper.
Then I got out the trusty glue gun to glue the earing backs onto the beads and buttons. I found it easier to dip the earing back into the melted glue (instead putting the glue onto the back of the beads) and also to keep the backs straight we didn’t have the earing stopper on the earing backs so it balanced better while drying.
Once they dried we put the earing stoppers onto their backs and ………..
We now have an endless supply of earing studs!!

 
We find that the plastic earing backs are the best as they don’t seem to irritate the ears even after they are worn for a LONG time!!

Saturday 21 November 2015

Craft Wire Rings


Craft Wire Rings


We love these easy to make rings made out of coloured craft wire

We started with about 30cm of craft wire and wrapped it around some dowel that was pretty much the same size as Serenas finger.
The next step was simply to wind/twist/roll up the ends!!
To roll up the ends we used pliers and rolled the wire around the end of the pliers to make a little circle, then we used our fingers to roll the rest of it up.
 

When we used 2 colours we wrapped some silver wire (that was a little thinner, less bulky and easier to wrap) around the two pieces of coloured wire to join them together, then we wound it around the dowel and twisted/roll up the ends.

To make this green ring we folded the wire in half then threaded the end back through the centre at the fold then wound/twisted/rolled the ends.
   

P.S. When using pliers wrap the ends with a bit of electrical tape so it won’t mark the colour wire.


Tuesday 17 November 2015

2 Skirts to 1


2 ’Would not Wear’ Skirts to 1 ‘love it’ Skirt !! 
 
I found 2 skirts – one I would not bend over in and the other a little dated at Vinnies for $4 each SO I decided to combine them to make a skirt that I could wear every day.

Frist step was to cut the hem off the little denim number so it won’t be too heavy when sewing, then I cut the long skirt to the length I wanted at the waist.


I overlocked the denim hem and used the ‘roll’ stitch on the overlocker for the long skirts waist.


Then I used a loose long straight stitch on the normal sewing machine for gathering. I sewed 2 rows and placed pins to mark the quarter points. Very gently I gathered until the long skirt was the same size as the denim matching the pins with the seams of the denim skirt.


Pinned and sewed the two parts together and……..


Another amazing result if I can say so myself !!
 

Here is another one I have made by cutting my old jeans just under the fly and gathering and sewing a length of matching material for the skirt.


Saturday 14 November 2015

'Beadiful' Pens


‘Beadiful’ Pens


We just love using these beautiful bead decorated pens. Serena has made them for her close friends.

What you need is some pens (make sure they are the type that the end pops out), some beads (as you can see our bead collection is made up of lots of odd beads that have been collected over a long period of time) and some clear threading bead elastic.

First Serena laid out the bead pattern she wanted for each pen.

We then cut a length of the clear threading elastic and tied a small bead onto the end, followed by threading the other beads on in order making sure that the first bead you thread is the bead you want at the bottom of the dangling group.

In the next step we popped out the top of the pen and threaded the clear elastic into the tube then replaced the pen top jamming the clear elastic into it.

How easy is that!!

Serena bunched them together in groups of three and tied a bow around them for her friends (lucky them!!)

Thursday 12 November 2015

Dingle Dangle Shirt

Dingle Dangle (upcycle) Shirt

A long sleeve winter shirt to a cool summer top!!

 
We are loving this top!! As summer is here and I doubt that Serena will fit into this shirt next winter, so we decided to get more wear out of it.
Here are some easy to follow instruction on how to make this amazing summer top


The first step was to unpick the hem just to give you a little more length and when tying its eaiser without that extra bulk.


 I then measured out 2cm width strips (approximately 20-25cm long) right around the base of the shirt
 
(how easy is this so far!!)
 
Now I pass it onto my daughter to finish off 


Serena cuts carefully along each marked line all the way around (some were a bit wonky but in the end it wasn’t noticeable)


The next step was for her to pair up and tie the fringed lengths together
When she has gone around once we started on the second row.


Leaving about a 2cm gap she tied one fringe from each of the pairs together to get a ‘diamond’ gap.
Then we repeated that step again for the third row
 
Volla we have now a great little summer top !!
P.S. We also cut the sleeves short. Serena didn’t want them fringed so we just cut them to the length she wanted.


Here is another one we did but didn't cut the strips as long and tied colour beads on the ends